January 31, 2017

Crayon Melt Art ft. Craftin Desert Divas

It's been raining quite a bit in San Diego lately, so I'm in the mood of creating a rainy scene. I immediately thought about recreating a card version of the artistic crayon melt arts I saw on Pinterest.


Trial One: This is perhaps the most common method, or what you would normally do with a canvas. But nope, it does not work on paper.
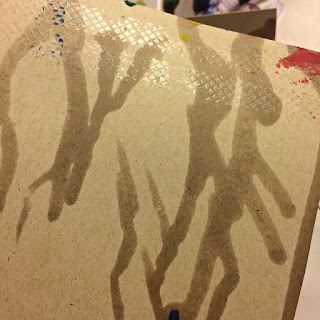
 I adhered the crayons temporarily to a piece of card board and placed the cardstock right under the tips of the crayons. Then, holding the cardboard in a standing position, I began melting the crayons with my heat tool. The colors didn't drip the way I've imagined, but instead they just splattered and mixed in the most uncontrollable fashion. Something I noticed right away: as you melt the crayons, wax (?) seeps through the paper leaves marks shown in the right picture.

  
Trial Two: So then I tried drawing with my crayons and melting the lines afterwards. The result, not so impressive. They don't have the dimension and thickness I was hoping for.  

Trial Three: I ended up melting each crayon one by one by holding a crayon perpendicular to the cardstock and applying heat to the tip of the crayon. You need to move the crayon along the panel as it melts so it will create strokes instead of puddles of colors. 

I colored this Rainy Day Girl image from Craftin Desert Divas with Copics, and the colors I've used are listed below: 
Red: R27, R37, E09
Orange: YR04, YR07, R08
Yellow: Y11, Y13, Y15
Green: YG13, G07
Blue: B23
Purple: V04, V06, V09


Then I adhered some rainbow colored sequins and that finishes off the card! This one is definitely a little different and more artsy than my usual creations, but I hope you have enjoyed looking at it as well. Thanks for stopping by!

January 22, 2017

Winter Penguins Valentines Card ft. Craftin Desert Divas

Hey there! Today I'm sharing another winter themed card, but this time it's a Valentine's Day card as well. Isn't this image just adorable?! This is Love Letters & Hugs and it's one of the newer digi stamps from Craftin Desert Divas. The night sky/color scheme is inspired by CDD's monthly challenge mood board (shown below). 


I started by creating a scallop circle mask with the third largest die in Stitched in Circles set. Then I distressed my card front with Chipped Sapphire, Dusty Concord and Seedless Preserves distress inks. I've also splattered some water onto the distressed area so that the faded circles mimic falling snow. Can you tell that lately I'm a little addicted to drawing snowflakes with my white gel pen? I think they add a nice touch to cards and definitely pop  up against this dark background. 
I colored my penguins with Copics and all the colors I've used are listed below: 
Penguins: C1(face & belly) C3, C5, C7 (body) 
Y11, Y13, Y15 (beak & feet) R02 (blush) V09, Y13, G21 (flower)
 Letter: RV11, RV29
Ice: C3, B32
I added a piece of washi tape since it matched the color scheme perfectly and the pattern kind of resembles snowflakes. Then I added my sentiment strip and wrote the sentiment with a white gel pen. I applied some wink of stella to the penguins for some extra shine, and that finishes off the card!

Challenges Entered: 

Winter Angel Card ft. Neat & Tangled


EDIT: Top 3 at MarkerPop

It's hard to believe that we celebrated Christmas just a month ago, and here I am creating my first Christmas card of 2017! I guess it's never too early to start making Christmas cards. ;) I started by stamping and heat embossing the faceted background stamp with WOW White Pearl embossing powder. Then I colored the triangles with different shades of yellow. The Copic colors I used are: YR23, YR21, Y11, Y13, Y15, YR14.

I don't have a star die (but should really get one) so I simply printed out a star, cut it out and then traced it on the faceted background. I then cut out a slightly larger star on white cardstock and added a black border. 


The stamp set I'm using today is Little Angel from Neat & Tangled. I colored her with Copics, and the colors I've used are listed below: 
Dress: BG10, BG15   Wings: B01
Hair: Y11, Y21   Face: YR00, R02   Blush: RV11
I've also drawn some snowflakes on her dress with a white gel pen and embellished it with small white pearls.
I wanted to make her wings shimmery and translucent, so I stamped them on vellum, flipped it to the back (because my black ink was barely drying on vellum) and colored with B01 and wink of stella shimmer pen. Then I realized that if I had just adhered the wings on top of the star, the yellow triangles would be peeking through. So I ended up adhering a pair of white wings beneath the shimmering vellum wings. It was definitely more complicated and time consuming than what I've expected, but I really love how it turned out.


I die cut a bunch of white snowflakes with Lawn Fawn's Stitched Snowflakes dies and adhered them to my card front. I think this white on white technique adds quite a bit of interest to the background, but at the same time does not distract too much from the focal point. Then I die cut a gold glitter frame using Craftin Desert Diva's Fancy Frames die, mounted it on foam tape and adhered it to the card front as well.


When I was creating the background, I forgot to leave some white, even space to stamp my sentiment. But I thought the unevenness would look quite interesting anyways. So I stamped it like how I normally would and filled in the gaps with a black pen. To finish off the card, I added a good amount of sequins and small rhinestones to embellish the card. This is definitely a card with lots of details and it took me a couple hours to create it from start to finish. I really like how it turned out, and I hope you have enjoyed looking at it, too! Thanks so much for stopping by! 

Challenges Entered: 

January 17, 2017

Stay Warm Camping Bear Card ft. Craftin Desert Divas

EDIT: Top 3 at My Creative Scoop
Hey there! I'm sharing a quick post today about the second card I made with a digital stamp. This one is for Craftin Desert Divas's Monthly Social Media Challenge. Use any CDD products, create a card using the following mood board as inspiration, and link up for a chance to win prizes! I was inspired by the mesmerizing purply pink sunset and decided to pair it up with the Camping Bear digi stamp. After coloring the scene with Copics, I added a generous coat of wink of stella to the sky portion and drew some snowflakes with a white gel pen. To finish off the card, I adhered some clear sequins from the Sprinkled Sugar pack. That is all from me today, and thanks for stopping by!

January 12, 2017

Chinese New Year ft. Craftin Desert Divas

Hello and welcome! I hope you are enjoying year 2017 so far. Today I have a Chinese New Year card to share with you. This card features the Dragon Festival stamp set and the Fancy Frames Dies
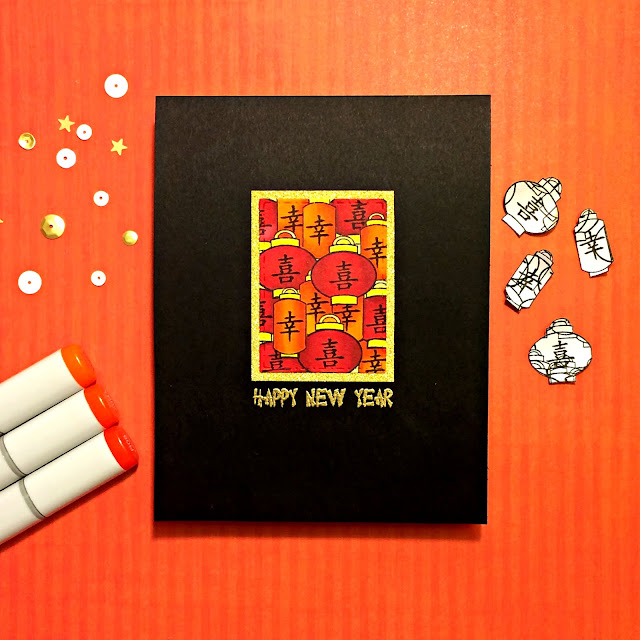
I started out by die cutting a small white panel using the smallest rectangular die from the Fancy Frame set. Then I made 4 masks (two of each design) for the two lantern images and fussy cut them out. To create the lantern background, I used repetitive stamping technique and filled up the white panel as I overlap the images and use the masks in between each stamping. I've used Copic Sketch Markers to color the images. Colors I used:
Red: R27, R37, E09
Orange: YR04, YR07, R08
Yellow: Y02, Y15

I know it is the Year of the Rooster, but I couldn't resist coloring this little dragon and adding him to the card. To make him pop up even more against the background, I decided to adhere a strip of vellum and also add some shimmer to his tail and antlers (?) using the Wink of Stella pen.
Green: YG13, G07
Oranges and yellows are the same as the ones mentioned above.

If cute critters aren't your thing or if you want to save the dragon for the Year of the Dragon, you could leave the card like this with the lanterns panel as your focal point. I wasn't aware of this design until I started assembling my card. And to be honest, I like both designs equally. I think this one looks more adult-like/mature with its CAS style and the touch of gold is prefect. 
Thanks so much for stopping by, and have a great new year! 
Powered by Blogger.