April 29, 2016

Penny Black April Shower

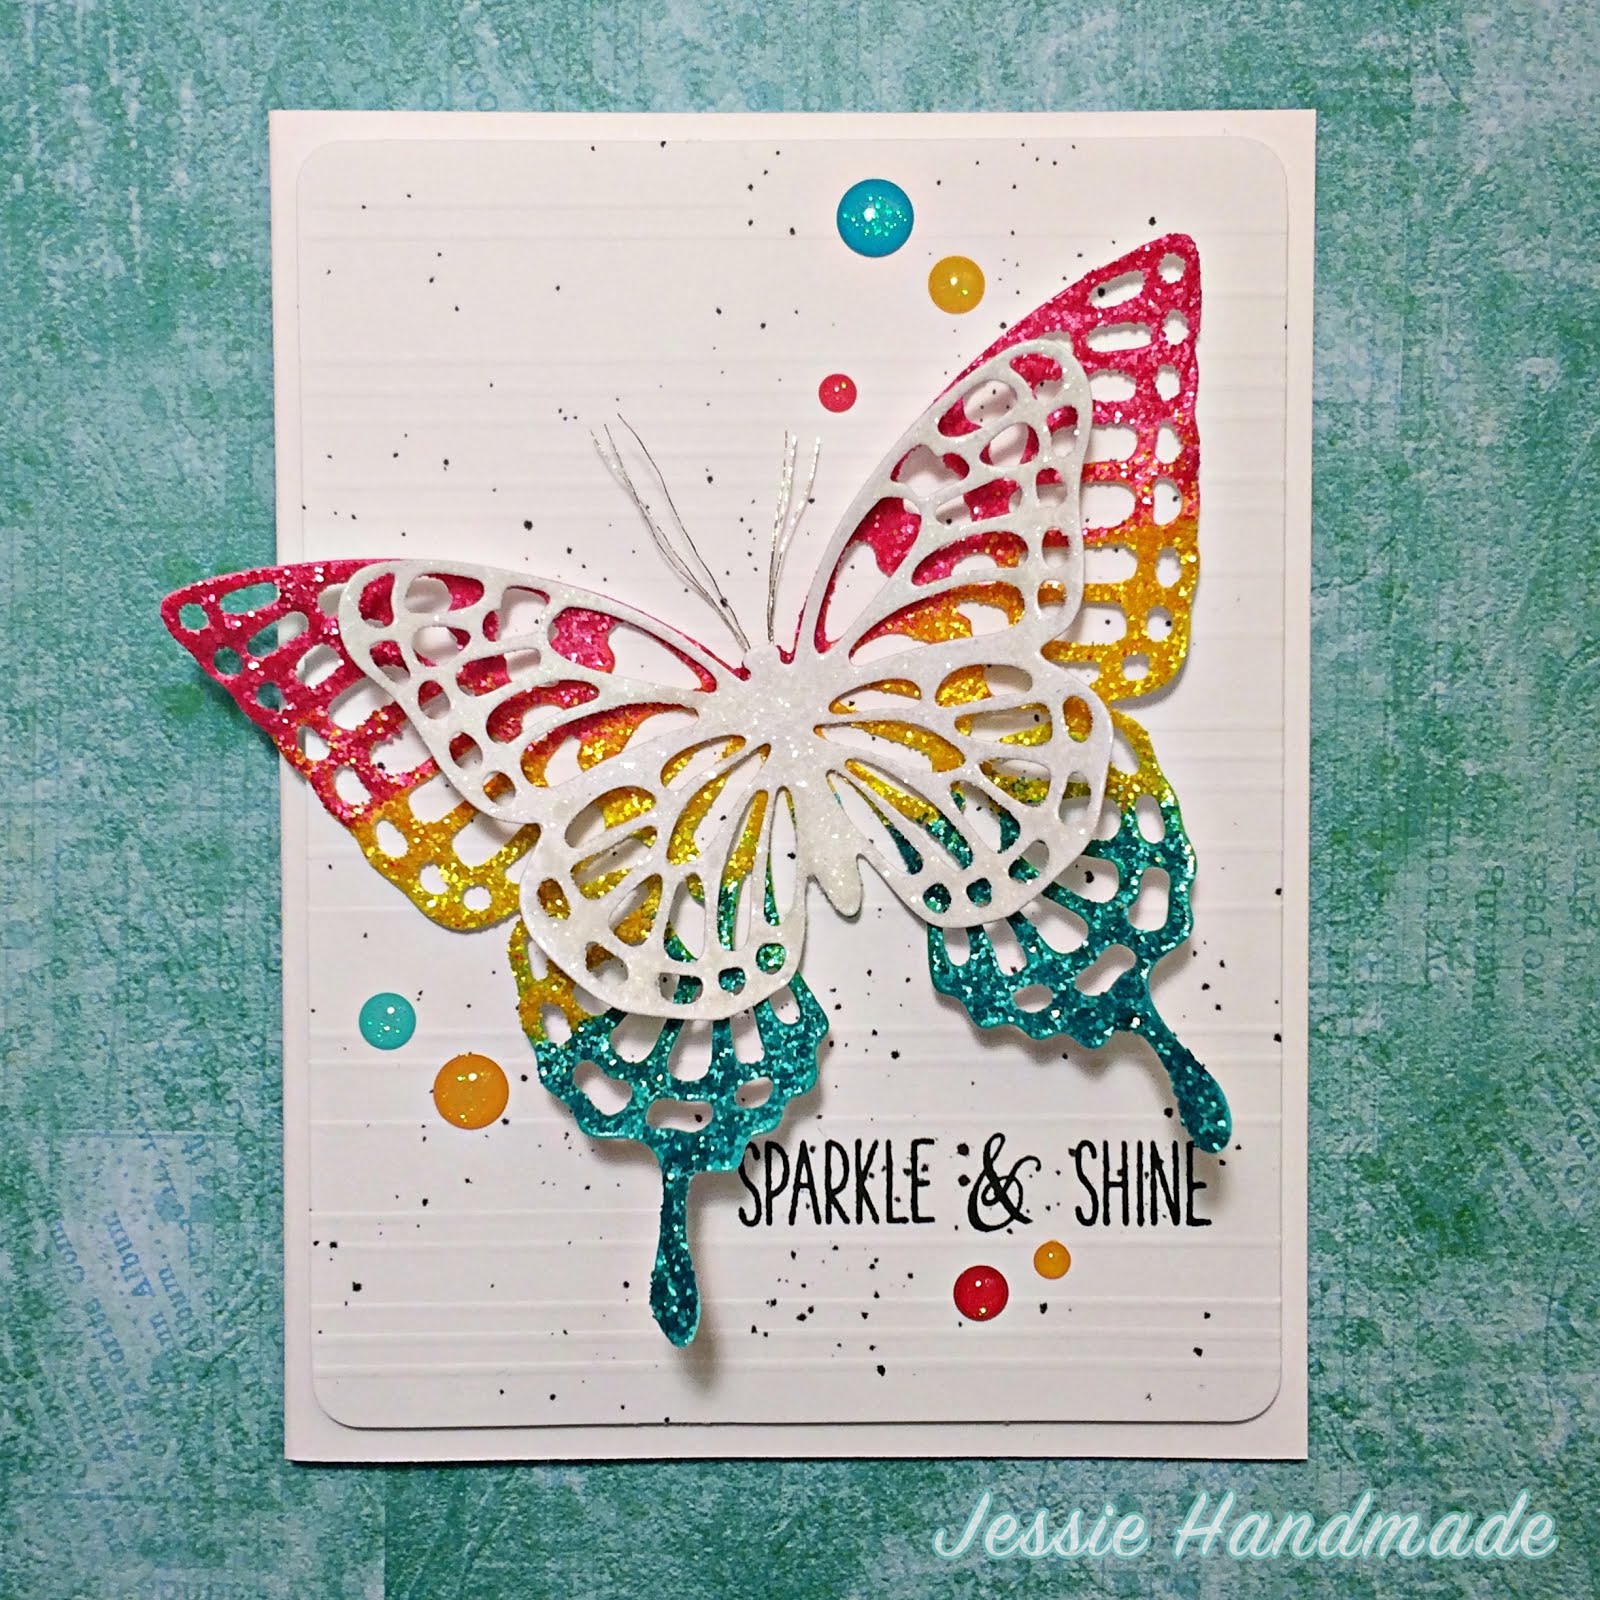
Does this card look somewhat familiar to you? Well I created a card (shown below) a few days ago using the same ink and paper! I actually have that "blue sky white clouds" patterned paper for a long long time, but since I tend to make floral, cute/girlie or vibrant cards, I never really have a chance to use it. I'm so glad that I've been participating in card challenges. It's only been a week since I first entered my glitter butterfly card over at the Paper Players, but I've already learned so much during the past week! I created my first mixed media project, tried different sketches at various blogs, and purchased different stamp sets to create cards that I normally wouldn't create! 

I mixed and matched the hedgie image from Penny Black (Party Time) with the weather images from SugarPea (Whatever the Weather). 
 
The hedgie was holding a present in the original image, but since this time's theme is April (I chose to go with April showers), I decided to let him hold an umbrella instead. After partially inking up and stamping the hedgie, I used a cutting knife and cut along his little hand. That way I can tuck the umbrella under his palm and it'll look like he's holding it :)
Then I watercolored him using my Versa Magic ink pads. After that I stamped all the other images: the umbrella, the cloud, the rain and the sentiment and heat embossed them with either clear or silver embossing powder. I added a stripe of glitter tape from Stampin' Up, and that pretty much finished off the card!

Challenges Entered: 
   

April 26, 2016

Mixed Media Butterfly Layout

                       
This is my first attempt at creating a mixed media layout. I felt very challenged but did enjoy the process of creating it! I'm planning on putting it into a black framed shadow box and gifting it to a friend on her graduation. 


Challenges entered: 
 

April 25, 2016

Happy Graduation Shaker Card

My dear cousin's wife (she's like my big sister <3) is graduating this June and I'm so happy for her! I decided to make something special and fun for her to celebrate this memorable occasion. Nothing cheers me up more than a shaker card, so I'm hoping this will bring a smile to her face, too! 
I used the Large Numbers Framelits Dies from Stampin' Up. I love love love these dies and the coordinating stamp set (Number of Years). They are so versatile and their big size makes them extra unique! I'm so excited for the new Letters for You stamp set! Can't wait to get them, then I'll be able to say anything with my cards! #endlesspossibilities
 
The background was created by using SugarPea's Watercolor Brush Strokes stamp set. Another new favorite of mine. Since our university colors are navy and yellow, I decided to use different shades of blue ink for the brush strokes pattern and a sunny yellow patterned paper for the background. I think this card is super playful and hopefully it'll brighten up your day! Thanks for stopping by :)

Challenges Entered: 
 
SPDSS50 / CAGI #115 Glitter and Bling

April 24, 2016

Butterfly Card with Tim Holtz Distress Glitter (Black Background)

When I created this glitter butterfly, I couldn't decide which background, black or white, looks better with it. So I ended up making both. ;) View this post if you haven't seen the white background one yet! It also includes a step-by-step tutorial on how to make this glitter butterfly shown below. 

DIY A Temporary Foam Stamp and Create the Background 
I wanted to create a diagonal stripe pattern but I don't have any stripe stamps on hand. So I decided to use a trick I learned from Jennifer McGuire. 
1. Cut a thin piece of white fun foam and use a stamp runner to temporarily adhere it to an acrylic block. (I used my mini MISTI here for easier alignment)
2. Ink it up like you normally would with a clear stamp, and stamp the pattern on an A2 white card base. (It's that easy)
 
(Click on the image to enlarge)

3. I'm not sure if it's a result of my new juicy ink pad or the fun foam, but the edges are a little fuzzy. So I used my 0.35 Copic Multiliner to trace the edges. 
4. Mat a piece of black card stock on top of the card base.
  

5. Stamp the sentiment from Simon Says Stamp's Big Scripty Greetings with Versa Mark ink and heat emboss with silver embossing powder.
6. Tie the ends of a long piece of silver thread and make it into three loops. Arrange the loops and place the knot near the center of card so you can hide it under the butterfly's body. Adhere some parts of the loop to the card with mini glue dots. 
  

7. Stick a mini heart button to the butterfly's body, and adhere the butterfly to the card. That'll finish up this card!
I really can't pick a favorite. Which one do you like better? The white background one or the black background one? I would love to hear your comments! :)

Challenges entered: 
  

SSS Butterfly Beauty / SSS Make It Girlie / Happy Little Stampers MM Wings


April 23, 2016

Butterfly Card with Tim Holtz Distress Glitter (White Background)


I've been obsessed with Stampin' Up's Butterflies Thinlits Dies lately! I ordered a handful of stamp sets but I didn't have time to play with them yet. These dies have kept me busy. This is one of my recent creations and I'm pretty pleased with it. I love how the simple, white background contrasts with this bright, glittery butterfly. Fun but not too busy!


Butterfly Die Cuts with Distress Glitter 
1. Die cut one large and one medium sized butterflies from white card stock using Butterflies Thinlits Dies
2. Apply Picked Raspberry, Mustard Seed, and Peacock Feathers distress inks on the large butterfly using mini round ink blending tools. 
3. Cover the top portion of the die cut with a thin coat of glossy accents/diamond glaze and apply a generous amount of Picked Raspberry distress glitter. (My Judikins Diamond Glaze dries fairly quickly, so I work with small areas each time instead of the entire top portion.) 
4. Repeat Step 3 with Mustard Seed and Peacock Feathers distress glitters. 
5. Now cover medium butterfly die cut with Clear Rock Candy distress glitter. 
6. Adhere the two butterflies together. Remember to add pieces of silver thread between the two die cuts! 
        
(Step 2&3) Click on the image to enlarge

7. Stamp the "Sparkle & Shine" sentiment from Winnie & Walter's My Precious stamp set. 
8. Score some lines and splatter some black ink to add a little more interest. 
9. Then add a few enamel dots to finish off the card!
  
(Step 9)


A closer look at the background. Playing with glitter can get a bit messy, but it's definitely worth it, don't you think? :)

Challenges entered: 
Powered by Blogger.